Outdoors & Mobility
solar Christmas lights for a porch railing: C6 string or red-and-green rope?
Choose between C6 points and a red-and-green rope outline for a porch railing, then measure the route and place the solar panel.
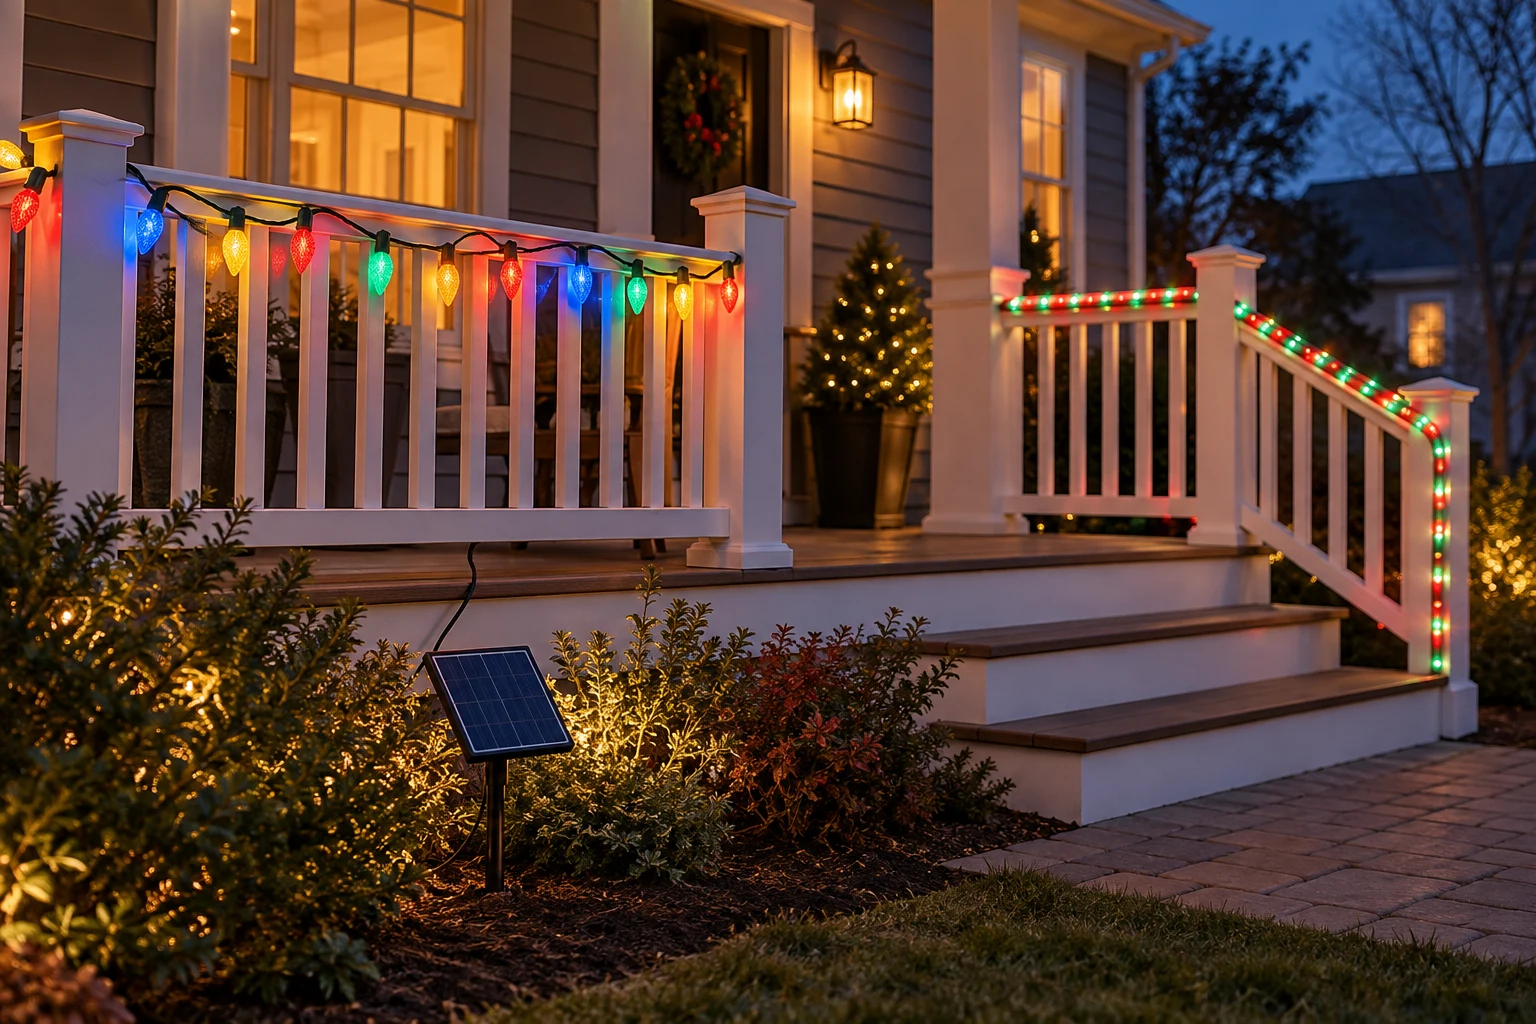
A porch railing is a narrow, visible line. The choice between separate C6 bulbs and a continuous-looking rope changes the shape of the display more than a headline LED count can tell you. Before buying solar Christmas lights for a porch railing, decide whether you want individual points of color along the top rail or a red-and-green outline that follows its edges. Then measure the route, find a workable daytime position for the solar panel, and check how the selected light can be fastened without damaging the railing.
Two current product pages give useful examples. The Linyan C6 solar Christmas string is presented as separate, multicolored strawberry-shaped bulbs. The Linyan red-and-green solar rope light lists LEDs inside clear tubing. These are examples of different physical forms, not a measured test of brightness, charging speed, weather endurance, or life span. Product titles and descriptions sometimes conflict on counts and lengths, so confirm the exact variant and package before you plan cuts or attachment points.
Choose the line your porch needs
Stand across the street or at the approach to your door and look at the railing as one shape. A row of distinct C6 bulbs gives each point its own outline and usually reads as familiar Christmas trim. A rope makes a closer-spaced, nearly continuous colored line that can describe the top rail, posts, and a turn around the landing. Neither is automatically more festive. The better form is the one that keeps the porch readable and leaves the entry, steps, and handhold usable.
Sketch the route with a start, end, each corner, and the panel position. A straight top rail may make either style easy to explain. A railing with close balusters, tight turns, or many short posts may call for a simpler run rather than weaving through every opening. If your chosen product cannot make a neat turn without strain, let the lights stop at a post and use the rest of the porch unlit. Do not assume tubing or wiring can be cut, spliced, or sharply bent; follow the selected model's instructions.
Keep the handrail itself comfortable to grasp. Lights that hang into the path of a hand, cane, stroller, or package become a practical problem even when they look tidy from the yard. A route on the outside face of the railing may preserve the grip, but check whether it exposes the run to rubbing, branches, or people passing below. The exact mounting method depends on the railing and the product. Select fasteners appropriate for both, and leave them loose enough to avoid pinching the wire or tubing.
Measure the actual run, not only the rail
Use a flexible tape or a string along the precise path that the lights will follow. Include turns around posts, vertical drops you actually intend to illuminate, and the distance from the first lit section back to the solar panel. Record those as separate numbers: lit railing route and unlit lead to the panel. A listing's advertised total length may include the lead, may refer to a variant, or may differ between title and description. Treat the product page as a reason to verify packaging, not as a substitute for measurement.
The C6 page names a 39-foot, 100-LED product in its title, while its description also mentions a different length and LED count. That inconsistency matters if your rail needs nearly every foot. The rope page describes 66 feet of clear tubing with a 6.5-foot lead for the specified model. Confirm those figures with the exact option you order and any included instructions. A much longer set is not automatically suitable for a short porch: extra material needs a supported place to go, and its arrangement can change the appearance you wanted.
Measure both sides of the porch separately if they are not symmetrical. Mark the door opening and stairs as deliberate gaps. You may prefer two clean runs to one cable crossing an entrance, but that choice can require two separately supported products and panel positions. Do not put a cord across a walking surface to force one continuous display. A smooth single railing run often looks better than a circuitous layout designed merely to consume the advertised length.
Place the solar panel before settling the design
A solar set needs its panel in a place where it can receive daylight under the maker's placement instructions. The porch railing may be under a roof, next to a wall, or shaded by trees during much of the day. Find the panel position first, then see whether the product's lead reaches the first light without stretching across a doorway or creating a loose loop. A tidy night display is no help if the panel location is shaded or the lead creates a snag.
Look at the porch over an ordinary day, not only at noon. Winter sun angles, nearby buildings, evergreens, and the porch roof can change which spot receives direct light. You do not need to promise a specific number of lit hours from that observation; actual operation depends on the model, weather, battery condition, selected mode, and available light. The captured pages do not establish a guaranteed runtime for your porch. If there is no viable panel location within the supplied lead, choose a different supported light plan.
The rope listing describes a panel with an on/off button and a stake and stand. Those parts may give placement choices, but the surface and the maker's mounting directions still govern. The C6 page also describes mode selection at its solar panel. Check where you can reach the controls without leaning over a stair or reaching through the railing. Locate the panel where it can be secured as intended and inspected later, not where a decorative photograph happens to place it.
If the display stays dark, separate the charging question from the railing layout. Confirm the model's switch, mode, and panel exposure according to its instructions before rearranging all the lights. The published solar lantern switch and sun check discusses the general diagnostic distinction, though its fixture is a lantern rather than either Christmas set here. This guide's decision is the visual and physical railing route; it does not diagnose a battery or promise a winter charging result.
Compare C6 bulbs with a rope on the railing
The C6 first gallery image shows separate lit points in multiple colors against evergreen branches. That makes it useful for judging the visual rhythm of individual bulbs, but the pictured tree does not prove how its wire will sit on your railing. On a straight rail, decide whether the bulb spacing gives the number of visible points you want. On a small porch, widely spaced points can leave dark gaps; on a busy railing, those same gaps may keep the trim from looking crowded. Read the exact variant specification before calculating spacing.
The rope product's first gallery combines a panel illustration with a nighttime display along a fence and porch-like structure. It supports the intended role of a red-and-green linear decoration, not a claim that the tubing will grip your particular rail or tolerate any bend. A rope tends to emphasize the rail's outline and can carry the color around a broad corner. Look for the maker's minimum bend and mounting guidance if given. Do not force the tube around a narrow post just to match a staged scene.
Color is a separate decision from form. The C6 listing presents multicolored bulbs; the rope listing identifies red and green. Choose the palette you want to see beside the door, wreath, and any other decorations. If the rest of the porch already has many colors, a restrained red-and-green line may read more clearly. If the porch is plain, individual C6 points may provide enough detail. This is an aesthetic judgment, not evidence that either model is brighter, safer, or better built.
Both listings mention multiple lighting modes. Pick a mode that keeps the steps and doorway visually calm and that suits the view from inside the home as well as from the street. Check how the model changes modes and whether it remembers a selected mode; do not assume either behavior from a broad product title. A flashing pattern that looks lively on a tree may distract on a handrail used every night. Test the selected setting after installation before deciding the route is finished.
Attach without turning the railing into a snag
Install on a dry, accessible day while the lights are off, following the supplied instructions. Lay the run along the proposed route before fastening it. Start near the panel end and check each corner with the lead relaxed. Use the product's approved clips or compatible non-damaging ties for the railing material. Avoid staples, nails, sharp metal edges, tightly cinched ties, and any fastener that pierces insulation or crushes a tube. Do not modify a sealed light string to make its length fit.
At posts and turns, leave enough slack to avoid pulling the next section taut, while keeping loose loops out of reach of feet and hands. A hard bend can change the intended shape of a rope and a taut string can stress bulb connections. Let the structure determine reasonable attachment points instead of fastening every few inches merely to create a perfect line. After fastening, use the handrail as you ordinarily would and look for a place where a hand or sleeve catches.
Check the lower edge of the railing and the steps from the normal approach. A line that appears secure from the porch may hang into the stair opening or over a walking route. Keep the panel, lead, and any excess lighted length away from door swing, snow-clearing tools, and routine cleaning. If the setup depends on a questionable crossing or a tight bend, shorten the planned route rather than changing the product. Measure again before committing to clips if a revised route uses a different amount of lighted length.
The pages characterize these as outdoor products, and the C6 description includes an IP65 claim, but a listing claim does not prove every connection or installation remains weatherproof when altered or mounted badly. Use only the complete configuration the manufacturer approves. Keep connectors and panel positioned according to its instructions, inspect for damaged insulation before installation, and remove a set showing damage rather than attempting an improvised outdoor repair. Follow local electrical and property rules for decorations on shared or rented railings.
Check the result from three useful viewpoints
At dusk, look from the doorway, the bottom of the steps, and the sidewalk or driveway. From the doorway, confirm that you can still grasp the rail and find the step edges. From below, check for dangling loops or cable crossings. From farther away, ask whether the display reads as separate C6 points or a clear red-and-green outline as intended. These views answer the layout question more reliably than comparing product images side by side.
Then watch a normal day-night cycle. Verify that the set turns on as its own instructions describe, that the selected mode is acceptable, and that its panel remains in a useful position. If the light changes after a cloudy day, avoid assigning a cause from one observation. Check the model's operating directions and panel conditions before replacing it. A solar set's performance on your shaded porch cannot be inferred from a staged photograph or from another buyer's location.
Return after wind, routine use, or cleaning and inspect attachment points. Look for a tie that has slid, a section that now rubs on a post, or tubing that has been pulled around a corner. Correct the route while the issue is small and before anyone relies on the rail. Seasonal decorations are temporary: plan how you will remove them without tearing a finish, leaving clips where hands catch, or coiling the set more tightly than its maker recommends.
Make the final choice
Choose C6 when individual multicolored bulbs suit a simple railing run and the confirmed variant's lit length fits your measured plan. Choose the red-and-green rope when you want the line of the rail itself to stand out and the tubing can follow its broad turns under the model's installation limits. In either case, panel daylight, lead reach, safe handrail use, and an unstrained fastening plan decide whether the product fits this porch. If one of those does not work, revise the route or choose a different fixture rather than forcing an attractive product photo into an unsuitable installation.
This railing decision is separate from arranging lights along the ground. The published Christmas pathway layout guide addresses the walk to the porch; it can help coordinate the arrival view, but a path fixture cannot answer how a C6 wire or rope light should be secured to a handrail. Measure the railing, choose the visible line, place the panel, and check the result where people actually use the entry.