Tools & DIY
Cabinet pull center-to-center spacing: match existing holes
Measure existing cabinet pull holes, then compare screw spacing, overall length, projection and fasteners before choosing a replacement.
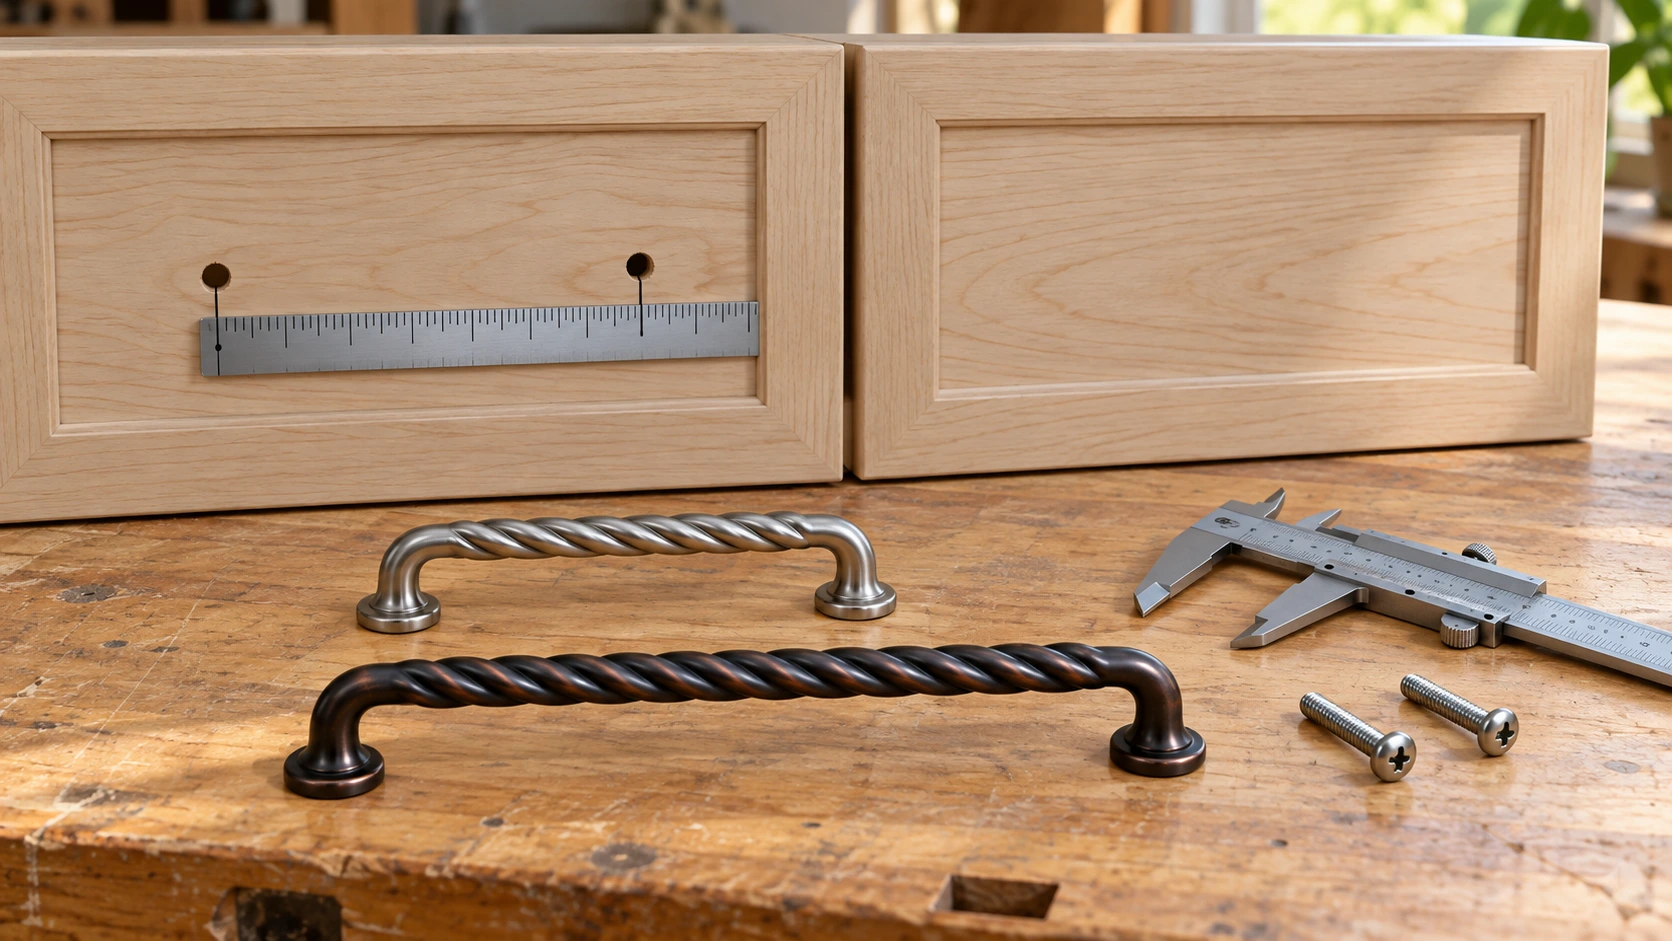
Cabinet pull center-to-center spacing is the distance between the centers of the two mounting holes, not the overall length of the handle. Measure it on the door or drawer before looking at a replacement. A pull with the same finish and a similar shape can leave one screw hole uncovered if that spacing is wrong. The quickest useful record is a photograph of the existing pull, the measured hole centers, and the door surface around them. That record tells you whether a new pull can reuse the holes without changing the furniture.
Locate the mounting holes before shopping
Open the cabinet or drawer and inspect the back of the panel where the screws enter the pull. If both heads are accessible, identify the center of each hole and measure between them. A ruler may be enough for a clear pair of holes; a caliper can help when the spacing is close to a catalog size. Record the unit and the measurement, such as inches or millimeters, beside the photo. Do not measure from the outside edges of the handle, since decorative ends can extend well past the screws.
If the existing pull is missing, inspect the empty holes from both sides. Confirm that they belong to one pull rather than an abandoned earlier installation. A filled or painted hole may look like part of the current pattern until you compare the inside face. Use the two holes that actually pass through the panel. If the surface has several overlapping sets, note each pair separately before deciding which set you intend to reuse. The visible finish alone will not tell you which holes a new pull will cover.
For a single-knob door, there may be only one mounting hole. Do not infer a two-hole pull spacing from the width of the door or from a nearby cabinet. A two-hole pull would require a separate layout and permission to drill, which is a different project from a direct replacement. Check whether the cabinet is rented, under warranty, or part of a matching set before making new holes. If preserving the surface matters, limit the search to hardware that fits the existing pattern or ask a cabinet professional about an approved change.
Record the panel thickness and the screw approach as well. A new pull can have suitable hole spacing while its supplied screws are too long or too short for the actual door. The fit depends on the handle's threaded openings, screw diameter and length, washers or spacers, and the panel material. Keep one original screw and pull if you can remove them without damaging the cabinet. The old parts offer a physical comparison, but they do not prove that another manufacturer's threaded pull uses the same fastener.
Keep center spacing separate from other dimensions
A catalog can list overall length, projection, width, and mounting-hole spacing for one pull. Overall length is the distance from one outer end to the other. Projection describes how far the pull stands away from the mounting surface. Width may describe the grip or decorative wire. Only the center-to-center figure directly answers whether two existing holes align with two mounting posts. Copy the label with each number into your notes so that a larger-looking handle does not accidentally become a larger hole pattern in your plan.
Measure across the centers, not from the edge of one hole to the edge of the other. If the holes are worn or enlarged, estimate the intended centers from the still-round portions or compare a sound matching drawer. A badly damaged hole may need a separate cabinet repair before hardware selection. Do not use a misaligned screw to pull the new handle into position; it can strain the threaded post, chip the surface, or leave the grip crooked. A direct replacement should line up before either screw is tightened.
Think about the room for fingers and moving cabinet parts after the hole pattern is confirmed. A pull can match the holes but project far enough to catch an adjacent door, appliance, or wall. Open the neighboring doors and drawers fully and look at the space around the current handle. Record any contact point or unusually close clearance. This is a different measurement from center spacing. Treat it as a second practical fit check, especially on a corner cabinet or a bank of shallow drawers.
Finish and shape also matter to a visible set, but they do not correct spacing. A satin nickel pull and a rustic bronze pull can use different hole patterns even when both have twisted wire styling. Compare photographs to the room, then return to the screw-center measurement. If you need every door to match, count the existing patterns across the whole run of cabinets. It is possible to find more than one spacing in a kitchen that has been changed over time. Label each group before ordering a large quantity.
Compare two current pull listings
The GlideRite satin nickel birdcage pull states a 3-inch center-to-center screw spacing. Its listing also gives an overall length of 3.25 inches and describes a steel pull with a 1.625-inch projection. These are separate measurements of one offered handle. The product photograph shows the twisted wire grip and two mounting posts, but it is not a scale drawing. Compare the stated 3-inch screw spacing with the holes in your cabinet before considering the look or projection.
The GlideRite rustic bronze birdcage pull states a 5-inch center-to-center screw spacing. Its listed overall length is 5.375 inches, with a 1.5-inch projection. The photograph shows a similar twisted-grip idea in a darker finish, but the mounting pattern differs from the satin nickel offer. Neither the visual resemblance nor the shared brand makes the two hole patterns interchangeable. A door drilled for one of these stated spacings cannot accept the other as a direct two-screw replacement without changing the holes or hardware.
Both offers describe installation screws, but a screw included in a package is only a candidate for the panel in front of you. Compare the included screw specification with the pull's thread and your actual panel thickness. If the listing does not show the needed length for your door, ask the seller or hardware maker before mounting. The first listing also presents conflicting pack quantities in its title and description, so verify the quantity with the seller if it matters to your order. That catalog conflict has no effect on the stated 3-inch spacing, but it does affect a bulk purchase decision.
Different center spacings describe different installation patterns. Do not choose the longer pull because it appears to offer a better grip and then assume the old holes will line up. Conversely, do not reject a pull merely because its overall length exceeds the hole spacing; the ends often extend past the posts by design. Use the specified screw centers for hole compatibility and the overall shape for visual and clearance checks. Each figure answers its own question.
Separate the pull from door movement
A loose or awkward handle may be only one reason a cabinet feels hard to use. If a push-to-open door fails to release or remain closed, the public guide on a push-to-open cabinet latch that will not engage addresses the latch and its door-contact path. Replacing a pull does not repair the latch mechanism. Before blaming the handle, observe whether the door itself moves freely and whether the latch meets its strike point. Keep that issue separate from the two-hole measurement.
The related guide on touch latches and strike plates explains those cabinet parts and their separate roles. A pull is the handhold used to move the door; a latch and strike plate affect closure or release. Some cabinets deliberately omit a pull for a push-to-open design. If you are adding a pull to one of those doors, decide whether the change is appropriate for the cabinet before drilling. Do not treat a decorative handle as a substitute for a damaged catch or a misaligned plate.
Check the hinge swing and drawer travel with the existing hardware still installed. A handle on the edge of a corner door may meet another pull when both doors open, even if each handle is correctly mounted. On a drawer, a large projection can interfere with a narrow walking path. Make these observations with the cabinet's actual surroundings rather than assuming a standard clearance. They are practical design checks after the hole spacing is known, not evidence that either product listing guarantees a particular fit in your room.
If the door has become crooked or the drawer front has shifted, a replacement pull may look misaligned even when the posts fit the holes. Inspect the panel edge and neighboring fronts before ordering a matching set. Adjusting hinges, drawer slides, or a latch is outside this article's mounting-hole decision. Keep a photo of the original arrangement so you can explain which part changed. The goal here is a sound handle fit on a sound panel, with other cabinet faults identified rather than hidden by new hardware.
Plan a direct replacement carefully
For a direct two-hole swap, confirm the measured centers, the new pull's stated centers, the panel thickness, and the available screw length before removing the old hardware. Keep the old screws in a labeled container until the new pull is fitted. Protect the front finish while backing out the screws, and support the old pull so it does not twist against the surface. If one screw is stripped or seized, stop and assess that repair separately. A damaged hole can make a correct new pull feel loose.
Hold the proposed pull against the panel without tightening. Its posts should meet the existing holes naturally. Inspect whether the grip sits level and whether its feet cover the old contact marks. If it needs sideways pressure to align, recheck the measurement and the product specification. Do not enlarge a hole merely to make a mismatch disappear; that can leave the handle unstable and the old pattern visible. A dry comparison is a useful stopping point before irreversible work on the cabinet.
Use the hardware maker's mounting directions and suitable fasteners for the actual material. Tighten both posts evenly without crushing a thin panel or scraping the finish. If the new screw does not engage smoothly by hand, compare its thread and length with the pull before applying more force. After mounting, pull gently in the normal direction and inspect the rear screws for movement. A handle that wobbles immediately needs a fastener or panel assessment, not repeated harder tightening.
Open the door or drawer through its full normal travel after the pull is mounted. Watch for contact with a neighboring face, appliance, wall, or another handle. Notice whether the handhold is comfortable without requiring a strained reach. This practical trial checks projection and placement, while the earlier measurement checked the hole centers. If the pull clears on an empty cabinet but catches when the door is used normally, document the contact point. A different shape or projection may be needed even though the spacing was correct.
Make the next order easier to verify
Save the hole-center measurement, panel thickness, selected finish, overall pull length, and projection as separate entries. Identify the exact drawer or door in the note. A short record such as “upper left drawer, two holes, 3-inch centers” is more useful than “silver birdcage handle.” If the cabinet has several patterns, photograph one representative front from each group. This prevents a later order from assuming that every matching-looking door takes the same screws or center spacing.
Check quantity and finish against the listing at the time of purchase. When a title and description disagree about pack count, confirm the actual number supplied before planning a multi-door replacement. Keep the seller's answer with the order details. Neither quantity changes the hole spacing, and a bulk price should not pull you away from the measured fit. If the seller clarifies a discrepancy, retain that response with the order record. A returned carton is a slower way to discover that the count or finish differed from what you expected.
If the old pull has an unusual center spacing, search by that measurement first. A longer or shorter lookalike may be available, but do not infer compatibility from a product family name. When no direct replacement fits, decide whether a repair plate, filled and refinished holes, or a new drilled pattern is acceptable for that cabinet. Those options require their own material and finish decisions. Preserve the original measurement so any later installer knows what was there before the surface was changed.
The useful decision is specific: two existing holes have a center spacing, and a replacement pull must state the same spacing for a direct fit. The two twisted-handle examples have different mounting patterns, which is why appearance is a poor substitute for measurement. Confirm projection, panel thickness, screws, finish, and quantity as separate checks. If another cabinet problem affects movement or closure, diagnose it on its own rather than expecting a new handhold to solve it.