Audio & Video
music stand parts: read the desk, joint, pole and base
Identify a sheet-music stand’s desk, adjustment joint, column and base using two actual listings and the stand’s own instructions.
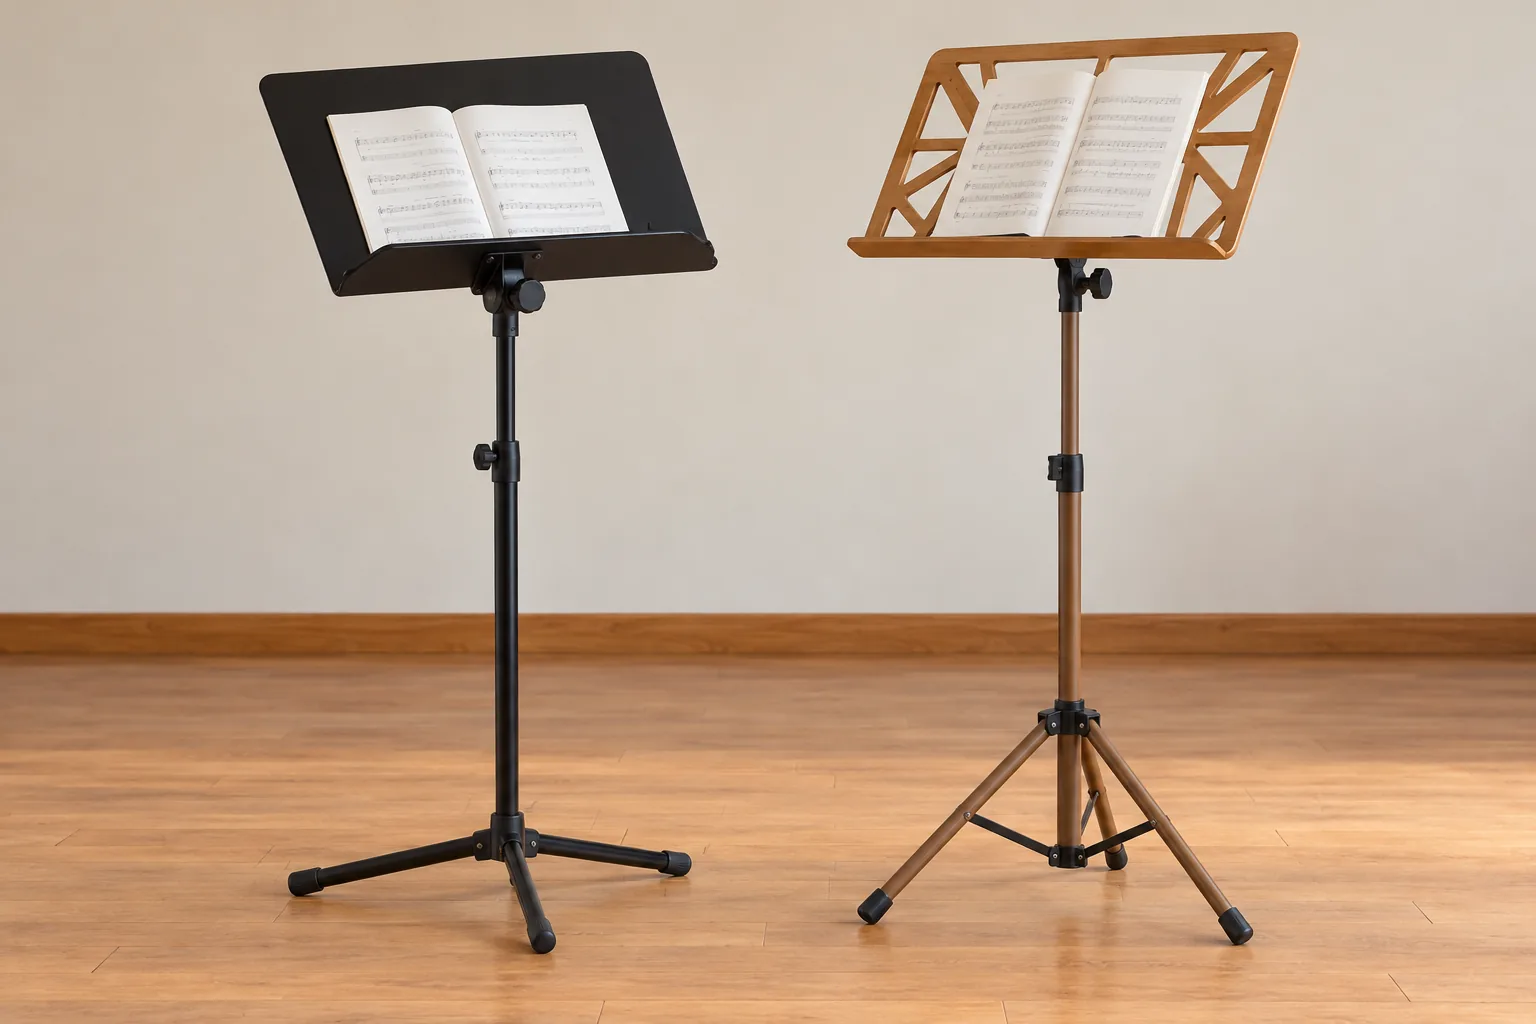
A music stand looks simple until you try to adjust one without knowing which part is supposed to move. The score rests on a desk. That desk connects to a joint, the joint to a vertical support, and the support to a base. Reading those connections on the stand in front of you is more useful than assuming every knob works the same way.
Trace the music stand parts from the page down to the floor, then consult the instructions for the exact stand before changing an adjustment.
Two current sheet-music stands make the differences visible. One has a black solid desk and a compact three-foot base. The other has a brown open-pattern desk described as bamboo-fiber pressboard and a folding tripod. Their listings describe different controls. The photos help identify parts, but they do not show every assembly or locking step. This guide explains what to look for without turning either listing into an instruction manual for the other.
Start at the score desk
The desk is the surface that holds the music. Before reaching for a height control, place the actual score on the desk as the stand's instructions permit. A loose sheet, an open book, and a folder can sit differently. Look at the lower page edge and the page rest. If the material cannot stay open or the bottom line is hidden, changing the stand's height may leave the reading problem untouched.
The black sheet-music stand listing shows a solid desk with a lip at the bottom. Its gallery includes rear and side views of the desk and a separate view of its parts. Those images are enough to identify the desk as a distinct piece and to see where it meets the support. They do not prove how much weight an assembled stand will safely carry on a particular floor. Use only the load information and assembly guidance supplied for that exact item.
The brown bamboo-fiber music stand listing describes a bamboo-fiber pressboard rack. Its gallery shows an open pattern in the desk, an edge that holds pages, and views from the front, side and back. The material description belongs to this listing; the pictures alone cannot establish the material beneath the finish. A reader should check the actual page on the desk rather than treating either desk pattern as a promise that every book or loose sheet will behave alike.
A desk's appearance tells you where the page will rest, not whether the page will stay in place during a turn or near moving air. Open the score to the passage you will use. Make one ordinary page turn with the stand stationary. If a corner catches or a folder closes, solve that with the actual material and the stand's documented accessories or setup. Do not invent a clip or add weight to a desk whose instructions do not allow it.
One useful check is to separate the problem you can see from the adjustment you intend to make. If a page slips at the bottom edge, inspect the page rest and the material first. If the print is too far away, look at where the player will stand or sit before changing the column. If the desk faces the wrong way, find the desk joint instead of pulling on the whole pole. This simple diagnosis prevents a change in one part from being mistaken for a fix somewhere else. It also gives you a precise symptom to consult in the model's instructions.
Find the desk joint before turning it
Behind the desk is usually the first connection worth locating. On the black stand's gallery, a close-up shows a pivoting fitting and a knob behind the desk. The brown stand's images also show a control at the desk-to-pole connection. Both are visible joints, but their pictures do not establish that the controls tighten in the same direction, need the same force, or hold the same kind of load.
Read the control labels and the supplied instructions before loosening anything. Support the desk with a hand if the instructions call for it, particularly when a score is present. Change one setting at a time while the stand is unloaded if the manual requires that. Check that the desk remains where you set it before placing pages back on it. A tilted desk that looks right in a photograph can be hard to read from an actual player's seat.
The black stand's product description mentions a friction slide for small height changes and a knob for viewing angle. The brown stand's listing describes knobs and a rotating rack. Those are claims about two particular products, not a general map of music-stand controls. If the actual stand in front of you lacks the pictured fitting, stop using this comparison as an adjustment guide and follow its own instructions instead.
A listing photograph usually shows the stand already assembled. The actual package may arrive in sections, and the order of those sections matters only as described by that model's instructions. Lay out the supplied parts and compare them with its own parts list before assembly. A missing connector can make two large pieces seem as though they should press together when they should not. If the pieces or labels differ from the listing, record that discrepancy and ask the seller or maker for the exact guidance. Do not borrow a step from another brand's video because the finished stands look similar.
Trace the column and its locks
After the desk joint, follow the vertical member toward the floor. The column positions the desk within a stand's adjustment range. The two galleries show telescoping sections, but a photograph does not tell you how far each section can safely extend or where a locking point is engaged. A visible seam is a place to inspect; it is not permission to pull until the section stops.
Set a stand only within the limits given for that model. Keep one hand on the desk while testing the adjustment if its instructions direct you to do so. Once the chosen setting is secured, step back and see whether the page is readable from the actual playing position. If it is not, decide whether moving the player or the stand would help before extending another section. This guide explains the parts; a separate room-layout decision comes later.
Look for a connector or collar where the column meets the base. The black stand's parts image includes the desk, pole, base and small connecting pieces. The brown stand's close-ups show fittings at the rack and along the column. Keep the supplied pieces with their stand. Similar-looking threaded parts from two stands should not be swapped merely because they appear to fit.
Read the base as part of the support path
Both saved galleries show three-legged floor bases. Their shapes provide a useful check when identifying the bottom of each stand, but a gallery cannot certify stability on every carpet, floorboard or outdoor surface. The legs need to be opened and secured as the relevant instructions specify. Place the stand on the surface where it will be used, and inspect whether every intended foot contacts that surface.
Do the floor check before loading the desk. An empty stand that rocks is an issue to resolve, not something to hide with a heavy book. Look for an uneven surface, a leg that did not open as instructed, or a missing part. Do not improvise a repair or rely on another stand's photograph to work out a latch. If the base still moves unexpectedly, leave that stand out of the session until the specific problem is resolved.
The brown stand's listing calls its tripod foldable, while the black stand's gallery shows a base that is shown separately in its parts view. These details can help with storage planning, but they do not prove that either stand can be folded with a score attached or moved by carrying the desk. Empty the desk and use each model's own folding and transport directions.
Use the two examples without transferring their specifications
The black and brown desks give a quick visual comparison. One is solid and dark; the other is brown with an open pattern. Both route a score through a desk, a connection, a column and a floor base. That shared path is the educational point. The listed material, control description, dimensions and any load statement remain facts about their own offers. The stand you own may have a different joint or a different set of included parts.
Make a small parts map from the actual item: identify the page rest, locate the desk joint, follow the column, and find every foot. Then check the manual for the steps that correspond to those parts. If the manual names a lock you cannot locate, pause rather than adjusting a different knob because it is nearby. This inspection takes less guesswork than learning an unfamiliar stand by trial and error while someone is using it.
Only after assembly and locking are confirmed should you test a score. Put the music at the reading angle the player needs, make a page turn, and look again at the desk and base. The result answers a narrow question: whether this stand and this score work together in this position. It does not establish a universal weight rating or a better stand for every player.
Notice which observations are repeatable and which depend on the room. The name of a knob and the way a base opens are properties of the stand and its instructions. A readable angle, clear path and stable contact with the floor depend on the score, player and surface present that day. Keep those two kinds of notes separate. That makes it easier to reuse the mechanical setup next time while still testing the new room. It also keeps a successful trial with one lightweight score from becoming an unsupported claim that every score will fit.
Keep setup and rehearsal decisions separate
Identifying a stand's joints does not decide where two people should put their stands in the same room. The two music stand positions guide handles player spots, sightlines, page turns and walking paths with both stands in place. Use that room test after each actual stand has been assembled and checked on its own.
The mechanics also do not decide what a music session should feel like. The sheet-music afternoon guide is about making time for one familiar piece at home. That is a different decision from finding a knob, checking a base, or reading a product's material description. Keep the equipment check practical so the session can proceed on its own terms.
Leave a usable note for the next setup
Once the stand works with the intended score, note the model and the control that set the desk angle or column height. If several players share equipment, keep the model's instructions with its parts and storage place. A short note about a loose fitting, missing piece or difficult page turn is more useful than a remembered guess about where a knob belonged.
At the next setup, start with the stand actually in front of you. Trace the desk, joint, column and base again, confirm its documented locks, and test the current score. The parts map helps you ask the right questions while the model's own instructions supply the answers that a general article cannot.