Musical Instruments & Listening
electric guitar pickguard fit: match the body before a loaded assembly
Compare a loaded pickguard with the exact guitar body and leave unverified mounting or wiring details for maker guidance or a technician.
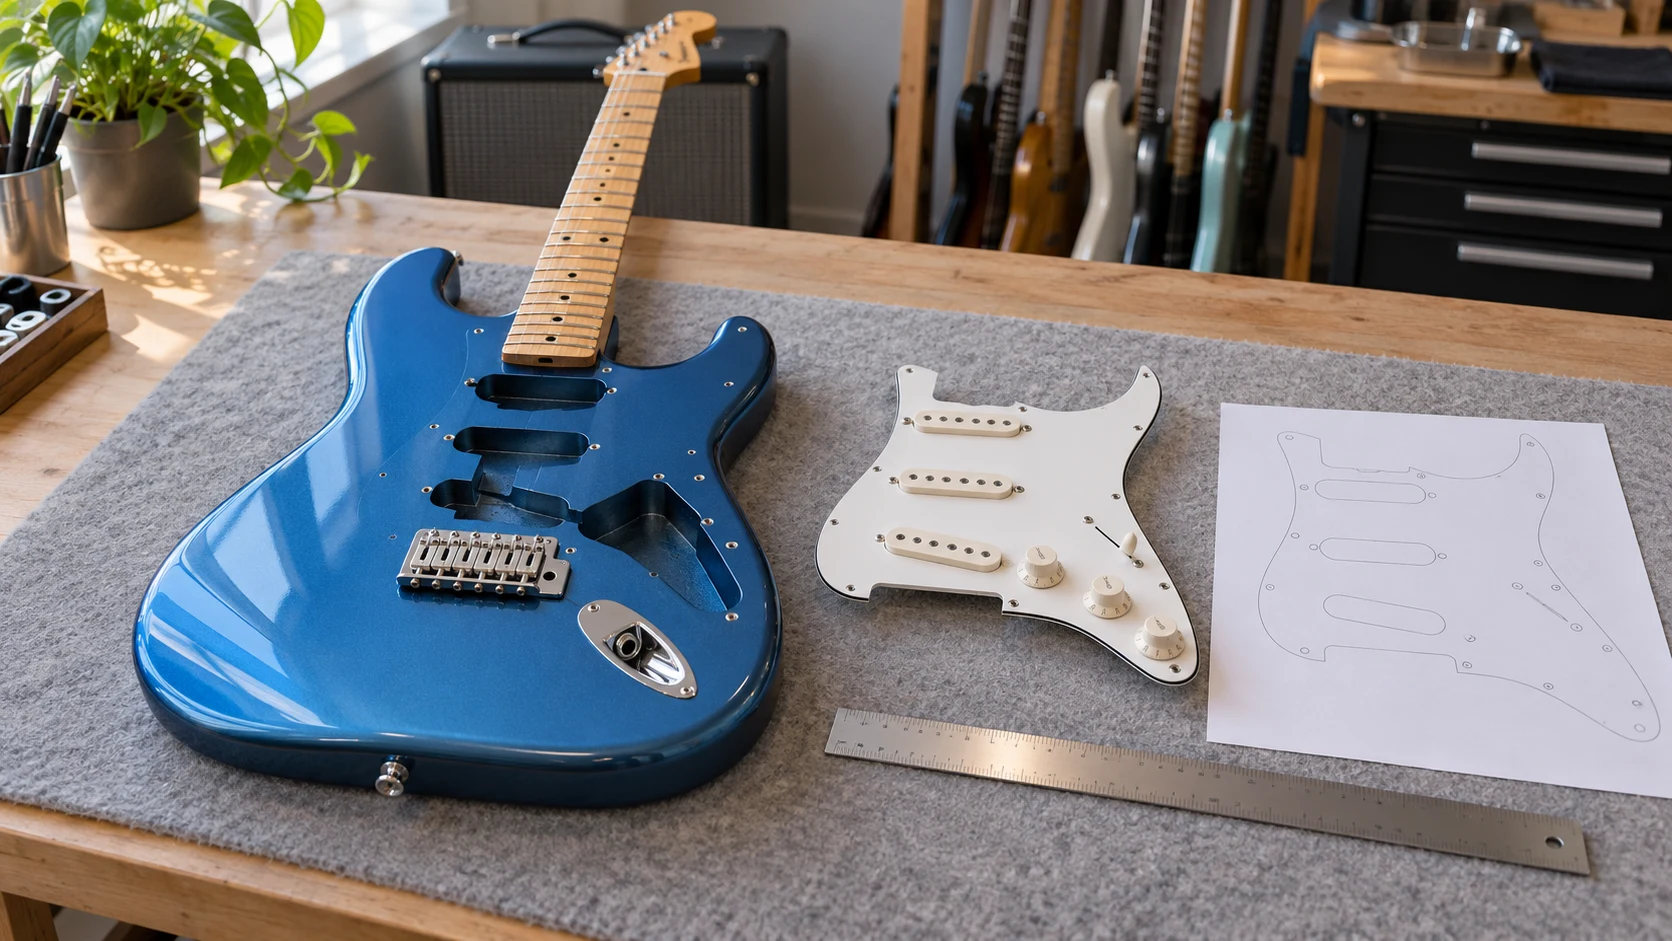
A loaded pickguard can replace several guitar parts at once, but the assembly still has to match one particular body. Electric guitar pickguard fit begins with the instrument you own: the outline of its current guard, its mounting holes, the route beneath it, and the controls already there. A broad model label on a listing cannot establish those details. Before you buy, document the guitar and decide which measurements you can verify yourself and which require the maker or a repair technician.
Two listings show why the distinction matters. The UPOUART loaded guitar pickguard describes an assembly with pickups, a switch, knobs, and screw holes, and lists overall dimensions of 14.4 by 3.4 by 0.9 inches. The alljita HSH prewired pickguard uses an ST-guitar fit description and describes two single-coil pickups and one humbucker. Those details identify candidates. Neither listing, by itself, proves that its perimeter, screw centers, component openings, and electrical connections match your guitar.
Document the guitar you actually have
Record the guitar's exact model and any production details its maker uses to distinguish bodies. A familiar silhouette is too broad for a parts decision. If the instrument has been modified, note that history as well: the guard now fitted may differ from the original specification. Take clear photographs of the front, the guard perimeter, controls, and visible screw positions while the instrument is in its normal state. Use the maker's service information or a qualified technician if answering a fit question would require opening a cavity.
Describe the existing pickup layout in ordinary terms. Count the visible pickup openings and note where the switch and knobs sit relative to the bridge and body edge. The alljita product title uses “HSH,” a common shorthand for humbucker, single-coil, humbucker, while its description says two single-coil pickups and one humbucker. Do not resolve that discrepancy by assumption. Ask the seller for the exact layout of the item offered, then compare its openings with your guitar's route and intended configuration.
Trace the perimeter of the current guard on paper, or obtain a dimensioned drawing for the exact guitar. Mark screw centers, pickup openings, control holes, and any notches beside the neck or bridge. A paper trace helps comparison; it is not a cutting guide. If the guitar already has a custom guard, preserve the shape that is actually installed instead of relying on a stock diagram. Tie each photograph and measurement to this instrument so a seller or technician can identify what was measured.
Keep other replacement projects separate. The guitar-string compatibility guide concerns string construction and fit, not pickguard geometry. Replacing a guard does not settle string gauge, material, or tuning choices. If your planned work includes strings, make that a second parts decision. Here the question is whether a loaded guard physically fits and whether its stated electrical assembly can be used on this guitar.
Photograph the guitar from directly above when you need to compare outlines. An angled picture can make the guard seem narrower and move apparent screw centers. Put a ruler in one frame if you intend to share a measurement, and label the unit. Keep the original image as well as any close crop, since a tight crop may remove the reference needed to judge scale. These records support a fit discussion without asking you to remove parts merely to follow an article.
Compare the candidate with the body
Start with the outside outline. Compare the candidate's actual guard shape with the existing trace, including the neck pocket, bridge side, and body contour. The UPOUART listing gives an overall size, but three numbers do not disclose every edge or screw location. The alljita page uses an ST fit description, yet that label can cover different instruments and revisions. Ask for a measured template or confirmation for the exact part when the available listing does not answer the fit question.
Then compare mounting holes one by one. The statement that a guard has screw holes tells you little about their spacing on your body. Mark the center of each existing hole on the trace and compare it with a dimensioned candidate drawing. A product photograph is rarely a reliable scale drawing. If the patterns differ, ask the guitar maker, part maker, or a qualified technician whether that combination is suitable. Treat the mismatch as purchase information, not a reason to plan new holes from a web image.
Look at the space required by the pickups, switch, and knobs. A loaded guard brings components beneath its visible surface, so matching the plastic or metal outline alone is insufficient. The alljita listing says its pickups are prewired for installation in an ST guitar pickup cavity; it does not identify the route in your particular guitar. Compare exact cavity and control details using maker documentation or a technician's assessment. Keep covers in place if you cannot verify the interior safely from available records.
Do not treat “prewired” as a promise of simple installation. A prepared assembly may still need connections or setup work determined by the guitar's existing circuit. This guide does not provide soldering, grounding, pickup-height, or wiring instructions. Ask the person who would install the part what work this exact guitar would require before you purchase the loaded set. That conversation can reveal whether an otherwise plausible guard needs extra parts or falls outside your intended work.
The UPOUART listing describes a switch and knobs and claims that the guard helps protect against scratches and wear. That claim does not establish electrical compatibility or performance on your guitar. The alljita listing describes a black pearl finish and Alnico 5 pickups, but its tone adjectives are seller language, not a guaranteed result on your instrument. Decide whether either assembly is viable from its fit and installation requirements; evaluate appearance and sound preferences separately.
Check the bridge and neck edges in the same comparison. Those boundaries are easy to miss when the pickups or finish draw your attention. A guard that appears close in its middle can still overlap a body contour or leave a gap at one end. If the seller supplies only a front photograph, ask for a flat measurement view or template. Do not print an unscaled web image and treat its dimensions as a technical drawing; display and printer settings can change the apparent size.
Separate model labels from exact evidence
A model family name can narrow a search, but it cannot replace a fit drawing. Write down the seller's exact product identity, dimensions if supplied, pickup layout, and stated instrument scope. Put the guitar's exact model beside those facts. Highlight the remaining unknowns instead of filling them with a generic ST diagram from another maker. If you contact a seller, send a clear image and measurements of your current guard, and ask for the offered item's mounting and route details.
Check what the package actually includes. “Loaded” and “prewired” describe the type of assembly; neither is an exhaustive parts list. The UPOUART listing names pickups, a switch, and knobs. The alljita listing names its pickup configuration and prewiring. Do not assume that screws, output connections, shielding, instructions, or tools are included unless the exact seller or maker confirms them. A missing small part can change the installation plan, so save the reply with the product identity.
The capo instrument compatibility guide tests a different accessory against guitar, banjo, and ukulele use. The useful shared habit is checking the real instrument. A capo's clamp question provides no evidence about pickguard screw holes, cavity routing, or electronics. Keep these accessory decisions distinct; a broad “works with guitar” label for one kind of part cannot establish that another kind will fit.
If a manufacturer supplies a precise drawing, record its source and date beside your measurements. Mark which figures came from the candidate, which came from the guitar, and which came from a third-party example. Do not combine numbers from different revisions into a single supposed template. Ask for clarification when a drawing omits a crucial screw center or component opening. This small record lets a later installer understand why a candidate looked plausible and where uncertainty remained.
Keep the purchase question separate from an installation appointment. A candidate may appear physically plausible while still requiring inspection of the route or wiring before anyone commits to the job. Tell the installer exactly which product you are considering and what its listing does and does not say. A useful answer identifies the remaining measurements or records. If a seller cannot provide a critical detail, a different candidate with better documentation may be easier to assess.
Choose, defer, or change the plan
Choose a candidate when its outline, mounting pattern, and component spaces have support for your actual guitar and the installation work is understood. That support may come from exact maker documentation, written product confirmation, or an assessment by a qualified technician. The alljita listing's “fits ST guitars” phrase is only one piece of evidence. If the body has been altered or its history is unclear, give that information to the person assessing fit before ordering.
Defer when a decisive detail is missing. “Request the screw-hole drawing for this alljita guard” is a useful next action; “probably standard” is not. You can keep using the existing guard while the question remains open if the guitar is otherwise usable under its own instructions. Deferral prevents an uncertain purchase from turning into unnecessary work on the instrument. Save the exact unanswered question so the next seller exchange adds information.
Change the plan when a loaded assembly does not suit the body or the required electrical work exceeds what you intended. A different guard, separate components, or professional service may be more appropriate, depending on the instrument and available parts. This article cannot select one without those details. Record why the candidate failed. That note will keep a later search from returning to the same unsupported fit claim or incompatible mounting pattern.
Before ordering, keep a short packet: guitar model and modification history, current guard trace or drawing, exact candidate identity, unanswered fit questions, and any maker or installer guidance received. That is enough for a focused comparison without turning the guide into a repair manual. Electric guitar pickguard fit is a physical and installation decision. Product-specific dimensions and evidence from the actual body should settle the accessory choice before anyone loosens a screw. Keep the confirmed drawing with your guitar records for future parts decisions.