How-To Guides & Tutorials
How to hang pinch-pleat curtains by hooks or back tabs
Prepare and hang pinch-pleat panels with their supplied attachment, distinguishing adjustable hooks from hidden back tabs.
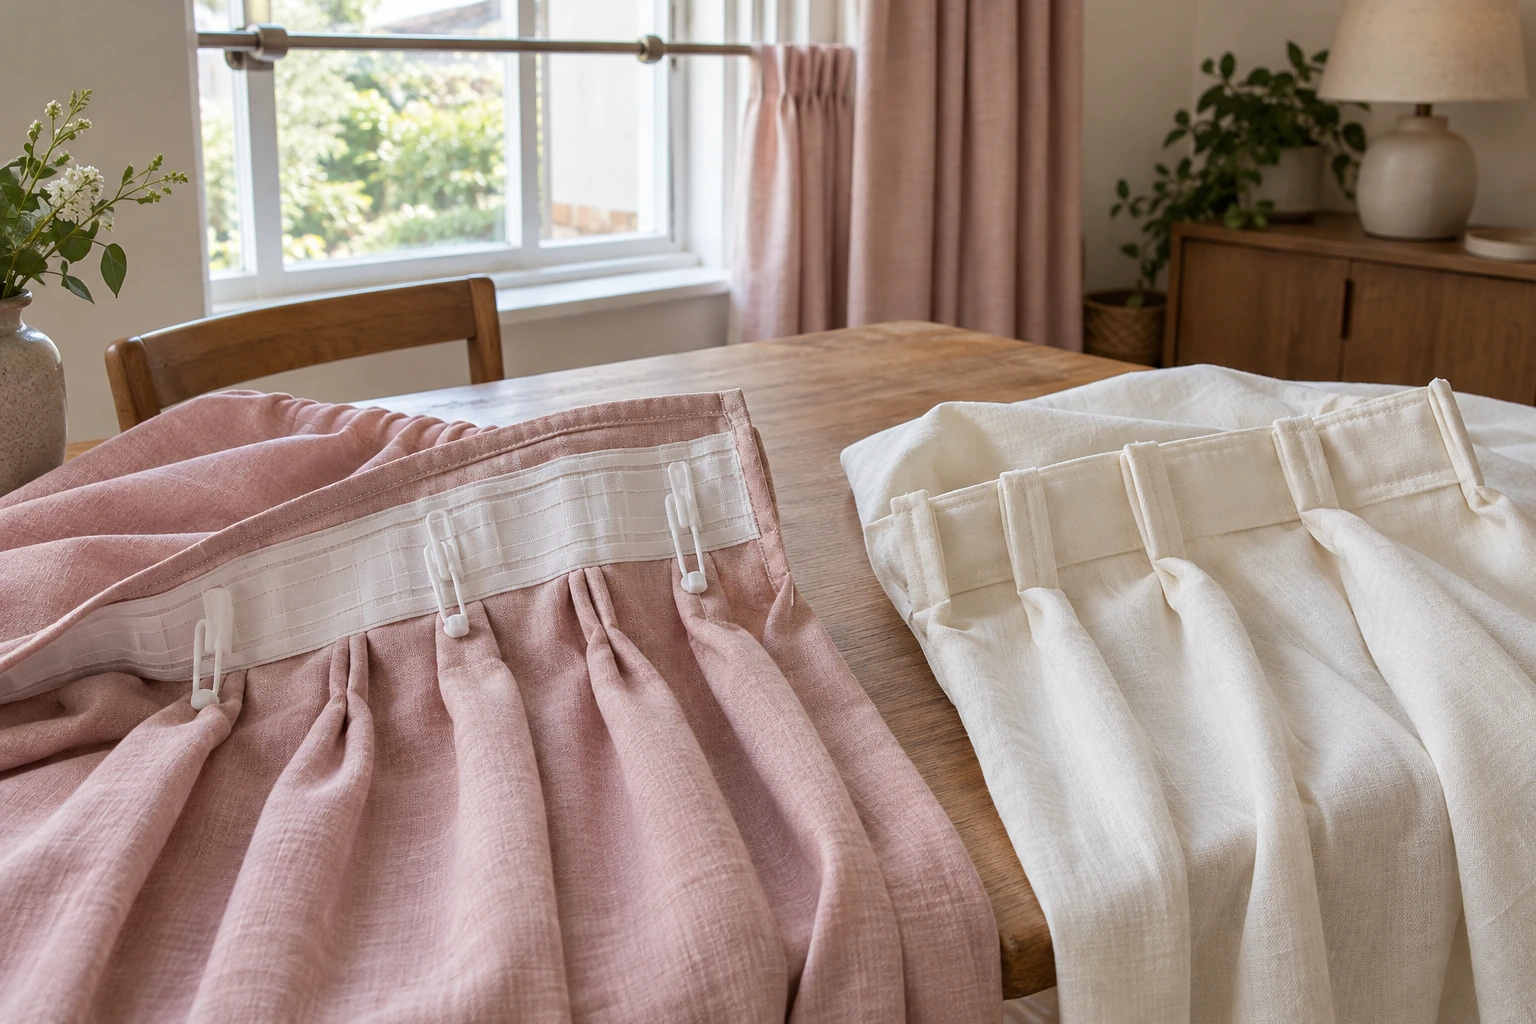
How to hang pinch-pleat curtains depends on the construction behind the pleats. Some panels use adjustable pin hooks, with the hooks joining ring eyelets or a suitable track. Others hang directly from a rod through hidden back tabs. Before taking down an existing curtain, turn the new panel over and identify its actual hanging method. The gathered appearance on the front does not establish what is attached behind it.
The two offers below show that difference. TWOPAGES describes a panel supplied with adjustable plastic pin hooks. Exclusive Home describes a Loha pair using hidden back tabs. This tutorial keeps the two paths separate and uses TWOPAGES' written installation and adjustment guidance for its pin-hook method. Begin with an already suitable support arrangement; this article gives no instructions for drilling, fitting wall anchors or modifying a rod.
Start with the panel and its hanging instructions
Place the panel where you can inspect the back of its heading without dragging the fabric across the floor. Find the instructions supplied with that particular curtain and the supporting hardware. Identify the curtain's top and bottom before adding any loose components. If several panels have arrived together, keep each one with its own packaging until you know which offer and size it belongs to.
Look for the attachment described by the applicable instructions. A sewn pocket, fabric tabs and a hook inserted into header tape are different arrangements. Do not push a hook through the decorative face simply because another curtain used a similar-looking metal piece. The method you need should be established before you begin hanging a panel above the window.
Choose an appropriate way to reach and handle the curtain safely. If you cannot access the existing support without an uncertain manoeuvre, get suitable help with that arrangement. A lightweight-looking panel still has to be handled at its actual position. Keep the area where you will work clear, and avoid starting a task that would require holding unsupported hardware while also managing the fabric.
The TWOPAGES panel follows the pin-hook path
The TWOPAGES TSISPPUN-5263-46 pinch-pleat panel is listed as one pink panel measuring 52W by 63L. It describes 500-gsm fabric containing 76 percent polyester and 24 percent cotton, with sewn-in pleats and adjustable plastic pin hooks included. The stated width is the finished pleated width. A single item in this offer supplies one panel.
The gallery shows the curtain fabric and the heading hanging beneath rings, but its beige-looking photographs do not confirm the delivered pink colour. Keep the stated selection and the visual question together if colour affects your order. The supplied adjustable hooks are the relevant attachment here. The description does not make a particular ring, rod or track part of the package.
TWOPAGES' general heading guide identifies pinch pleats as a style that uses plastic pin hooks and can work with a pole and rings or appropriate track systems. It distinguishes this from back-tab, rod-pocket and other headings. Keep any supplied hook beside the panel it came with while you compare the two backs.
Adjusting curtain pin hooks before hanging
For adjusting curtain pin hooks, TWOPAGES' FAQ describes a one-way adjustment sequence. To lower the hook, draw it down to the desired position. To raise it, draw it all the way down and out through the open bottom, then insert it again at the intended height. Follow the directions for the actual hooks supplied; do not force an unfamiliar mechanism upward.
Make the initial adjustment where you can see the component clearly. Keep the hooks intended for the same panel together as you work. If one behaves differently from the others, resolve that difference before hanging the fabric from it. This is not an instruction to trim a plastic part, bend it into another shape or substitute a metal hook borrowed from another curtain.
The maker's current guidance describes adjustment within three inches for its plastic pin hooks. That is an account of its identified system, not a new length specification for every curtain sold with adjustable hardware. Use the supplied instructions to establish the permitted movement of your own components. Adjusting a hook does not alter the dimensions sewn into the curtain panel.
Insert the hooks into the proper heading tape
Dunelm's separate hanging guide describes another pinch-pleat attachment: a sharp pin slid beneath the stitches at the back of a pleat, with the point concealed and the hook remaining visible. Its pencil-pleat section instead gathers fabric by pulling heading cords. These are different constructions and operations. Read the part that matches the curtain and hook you have, before using any of its steps.
The distinction matters at the work surface. Find the insertion point identified for your supplied component while the back of the heading is visible. If the instruction names a tape pocket, locate that pocket before continuing. If the expected feature is missing, leave the hook unattached and obtain the correct guidance. A search result headed pinch pleat can describe a different pin from the one beside your curtain.
TWOPAGES' written installation page directs the user to insert the adjusted pin hooks into the tape along the back of the pleated header, inside the seam, until secure. It then directs the user to hook those pins into the eyelets of rings on the curtain rod. This is the pin-hook sequence. Its separate instructions for soft-top, grommet and other headings should stay with those constructions.
Work along the actual attachment positions rather than inventing a new spacing pattern from the size of a bag of spare hooks. Lay out the panel so the remaining positions are easy to see as you continue. Keep a loose spare separate from a hook already fitted to the heading. Before lifting the panel, check the back again for a missed or unresolved attachment.
A matching hook position is only one part of hanging the curtain. The rod, rings and their support must already be suitable for the actual panel and arrangement. If the existing hardware needs removing to fit rings, use its applicable procedure or obtain appropriate help. This tutorial supplies no permission to prise a closed ring apart or loosen an unidentified supporting bracket.
The curtain ring and rod compatibility guide explains the distinction between a ring's opening, the rod limit stated for an offer and the connection beneath the ring. It also separates fitting access from the path a ring must travel afterward. Use that guide for an unresolved hardware match before beginning this hanging sequence; a pin-hook tutorial cannot supply a missing load rating.
The Loha pair uses hidden back tabs
The Exclusive Home Loha winter-white curtain pair contains two panels, each 27W by 96L. Its description calls the fabric linen-look and light filtering. It expressly directs hanging with hidden back tabs on a curtain rod and states a rod diameter of up to 1.5 inches. This is a different attachment from the TWOPAGES panel's supplied adjustable pins.
For this offer, follow the hidden-tab arrangement described for the actual panel. Do not add TWOPAGES pin hooks merely because Loha's title also contains pinch pleat. The Loha photographs show the back of the gathered heading, with fabric loops behind it. The description does not identify an adjustable pin-hook system or say that a set of such hooks is included.
Establish how the chosen rod is accessed under its own instructions before threading a curtain onto it. Where the actual panel uses back tabs, keep those loops in their intended sequence. Do not leave the supporting hardware partly dismantled while deciding what another panel needs. If the instructions do not establish a workable arrangement, stop at that question rather than cutting a loop or adding an improvised connector.
If you are hanging more than one panel, prepare the headings on the work surface before starting at the window. Keep the fabric faces and the room-facing direction clear as you handle each panel. Another person can help identify which part is ready for the next step without holding unsupported hardware. Agree on that help before moving the fabric into position.
Check the hanging result before altering anything
Once a panel is supported in the permitted arrangement, look at its position before making an adjustment. Identify whether a concern belongs to the hook setting, the chosen panel or another part of the support. Keep any change within the applicable component instructions. An unsatisfactory hanging position does not establish that cutting the hem, shifting a bracket or changing the rod is the right next action.
For an adjustable-hook panel, return to the maker's actual adjustment procedure when a permitted change is needed. Support and handle the curtain appropriately while working; do not assume the assembly should remain loaded during every adjustment. If the instructions leave that handling step unclear, obtain the answer before manipulating a component that is carrying the fabric.
When another window is next, place that curtain's instructions beside it before moving loose components. Ask anyone helping to identify which panel should be prepared next. If part of the job must wait, agree where its fabric and hardware will remain while the open question is answered. Keep an unfinished curtain identifiable to everyone working in the room.
The curtain length and panel count mismatch article shows how to handle competing dimension labels or an unstated quantity. It uses a real Lush Decor length conflict and an Eclipse description missing dimensions and package count. That is a useful next step if your problem is an unresolved product statement; it supplies no alteration or hanging procedure for the panels in this tutorial.
Keep the instructions with the curtains
When the task is finished, retain the relevant care and hanging information with the product reference. Store loose spare hooks so they can be associated with the panel they came with. If someone else will take the curtains down later, make the attachment method clear to them. A room containing similar-looking pleats can still contain different mechanisms behind the fabric.
Follow the actual curtain's care directions when it needs cleaning. Keep those directions separate from the hanging steps described here. A fabric's appearance or a photograph of a finished room does not establish a washing temperature, an ironing method or an instruction to steam it while it hangs. Obtain the applicable care information before beginning a different task.
Finish with the panel hanging by its own supported method and any remaining question identified. On another window, begin again with that curtain's construction and its actual hardware. The same decorative heading name can lead to a different task at the back of the panel.